Posts

A simple Admin page to manage user list in Remix & MYSQL

Image
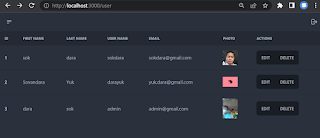
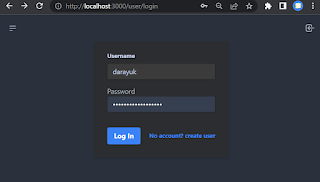
In the earlier tutorial, you learn to do authentication in Remix & MYSQL database . A visitor is able to create a new user account with profile photo and login to the remix app. Now we continue the tutorial by creating a simple admin page to manage user list. An authorized user will be able to see the user list, update an existing user, and remove the user from the database.  In the user folder, create index.jsx file. The index.js file is the admin page. It lists all registered users and has buttons to edit and delete a specific user.  import { json } from "@remix-run/node" ; import { useLoaderData } from "@remix-run/react" ; import { redirect } from "@remix-run/node" ; import {db} from "../../utils/db" ; import {getUserId} from "../../utils/session" ; export const loader = async ({request}) => { const uid = await getUserId(request); if ( ! uid) return redirect( 'user/login' ); try { let user

Authentication: Register & Login Upload form data with file in Remix & Mysql

Image
 In the previous tutorial, you learnt to do use Prisma to synchronize models with MYSQL database schema and create a migration to add a new column to users table .  In this tutorial, you learn how to create authentication system in Remix. A visitor registers an user account using register form. In the register form, the user can upload an profile image and other information such as first name, last name, username, email, and password. Upon successful registration, the user account is saved in MYSQL database. The password is encrypted using bcryptjs . A registered user logins to the app by providing username and password. A successful login will create a session for that user. To access a restricted API, a user has to be authenticated. In a restricted component, the user id is read from the session. If there is a valid user id in the session, the user is allowed to access the restricted API. Otherwise, it will be redirected to the login page. Run the following command to install bscryp

Migration in Remix with Prisma & MYSQL

 In the previous tutorial, you learnt to style remix app and setup navbar using Tailwind CSS and Daisyui. In this tutorial, you learn to use Prisma to work with MYSQL database.  Prisma is a new generation Object Relational Mapping tool of Node for PostgreSQL, MYSQL, MongoDB, etc. It is easy to synchronize database schema with Prisma schema and vice versa. With Prisma client, you can perform crud operations against the database with ease.  To install Prisma in to the remix-app, execute the following command. npm install prisma Run npx prisma generate to generate the Prisma Client.  Update the remix-app/prisma/schema.prisma file to include users schema. Change the database credentials to connect to MYSQL database on your local machine. generator client { provider = "prisma-client-js" } datasource db { provider = "mysql" url = "mysql://username:password@localhost:3306/db_name?schema=public" } model users { id Int @ id @ d

Style Remix app with Tailwind CSS

Image
There are different ways to style your Remix applications. The common way is using Tailwind CSS. Change directory to the remix-app created in previous tutorial. Then run the command below to add Tailwind dependency to the remix-app: npm install -D npm-run-all tailwindcss Then initialize Taiwind framework with the command: npx tailwindcss init The init command generates tailwind.config.js file. In the config file, you have to tell tailwind the file types that will be applied styles. In this example app, we apply styles to TypeScript and JavaScript files (ts, tsx, js, and jsx files). We are going to use Navbar component from daisyui - Tailwind CSS components. Thus, add daisyui library to the the plugins. /** @type {import('tailwindcss').Config} */ module.exports = { content : [ "./app/**/*.{ts,tsx,js,jsx}" ], theme : { extend : {}, }, plugins : [require( "daisyui" )], } Execute npm install daisyui command to install daisy in the remix-app